Here are a few shots of the dress the day of the wedding 🙂


If you want to see the dress construction click here
Until Next time, have a lovely day!
Here are a few shots of the dress the day of the wedding 🙂
If you want to see the dress construction click here
Until Next time, have a lovely day!
I love retro dresses, and if you look at my style page on Pinterest you would wonder why I don’t have more of them in my wardrobe! They are cute there are so many great styles that work for so many occasions!
So a few weeks ago I decided that I was going to make a new dress for a friend wedding. The dress had to be something that was comfortable and nursing friendly, so after going through the my patterns and hemming and hawing for a few days I decided to give Gertie’s shirtwaist dress from her first book a try. Once I had the pattern I dove into my fabric stash and away I went!

Photo credit: Gertie’s blog for Better Sewing
Because I wanted the dress to be versatile enough for a semi formal or casual setting I chose a classic black polka dot cotton fabric(you can never go wrong with a black and white polka dot😉).
After choosing my size and tracing the pattern from the book, I was ready to go!
I made a few alterations to the original pattern for a better fit, starting with adding an inch to the bodice length(my usual alteration because of my height), added some room to the bust, taking in the shoulder length and changing the collar shape. Usually at this point I would make a quick mock up to test the alterations but because I was feeling a little overconfident and my baby girl only lets me have a limited amount of time to sew, I decided to go ahead without it(bad idea, never skip the mock up!)
The pattern called for just over 3½ meters of fabric and I didn’t quiet have enough so I pinned my largest pattern pieces first and worked my way towards the least important pieces before cutting and luckily I was able to get away with piecing together only 2 pieces in the end, and using a different fabric for the pockets.
With the cutting finished, I moved on to binding my visible raw edges with a Hong king finish so I wouldn’t have to worry about the fabric fraying. This process took a while, but I love the clean lines that comes from this finish and it also makes the interior of a garment look fabulous!

Dress interior.
I started with sewing the pleats and darts in the front bodice and skirt pieces, then with those pieces sewn together got to work on the bound button holes(for those of you who don’t know, bound buttons holes are sewn at the beginning of a project, regular button holes are sewn at the end). I LOVE the look of bound button holes, but they are very labour intensive and you have to be meticulous with your stitches or they can come out crooked or oddly shaped. If you are on a time crunch I would recommend just sticking with plain button holes.
The next step was sewing the elastic shirring in the back of the dress, with 6 rows complete it was time to attach the yoke to the back bodice. It was at this point that I started having trouble with the pattern. After attaching the yoke I realised that the back of the dress was waaaaaay to poofy. So I removed the yoke cut off 1″ of the back of the bodice and sewed it back together (it was a bit better but still a bit to much poof).
After removing the inch in the back I realised I shouldn’t have added the length to the pattern, but it was too late to change it now as I had already finished the button holes in the front.
Next I sewed the pockets in place with a French seam, and then sewed the front and back of the dress together. With the body of the dress complete I moved onto the sleeves, which came together very easily 😄
The trickiest part of the dress at this point turned out to be the collar. The original pattern had a pointed collar in 2 pieces, and I decided to change it to a rounded one that was connected. I decided the easiest way to do this was to drape a collar, this way I could get the right proportion to the dress.
With my collar drape done I interfaced the under collar and attached it to the dress, then sewed the facing and upper collar in to finish it off.


The last steps of the dress was finishing the hem and buttons! If you follow me on Instagram or Facebook you know that I posted a few buttons choices and asked for your favourite.
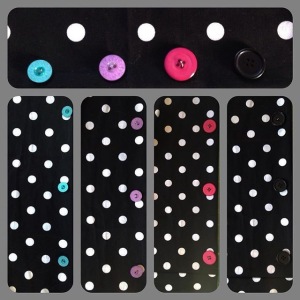
Buttons buttons buttons!
While the purple and teal were popular, the clear winner was
drumroll…
The Fuchsia!

♥ Thread detail ♥
The original patterned asked for a small turned hem, I wanted mine to have a bit of structure so I added 3″ horsehair crin and finished it with an invisible hem and hand stitching at the facing.

Overall I really like the pattern and I will definitely use it again in the future! There are a few changes I would have made to it if I had done a mock up first, but I am pretty happy with how the dress turned out 🙂


I’ll post photos of me wearing the dress in a few days, until then have a lovely day!
